Overview
As you can see, this robotic arm grasps two different kinds of components from the blue basket and puts them in the left. These two kinds of components are plastic and aluminium parts. The machine must find the components and distinguish them. The challenge is, the two different material reflect lights differently, because the light changes during the day inside a production line, which causes the traditional image processing algorithm to not work well often.
In this project, we will demonstrate how an industrial AI dedicated for this problem is developed and deployed on the Coral Dev Board, with AI-UI and a few mouse clicks.
Coral Dev Board
The Dev Board is a single-board computer that’s ideal when you need to perform fast machine learning (ML) inferencing in a small form factor. You can use the Dev Board to prototype your embedded system and then scale to production using the on-board Coral System-on-Module (SoM) combined with your custom PCB hardware.
Hardware setup
- PC with Windows System: the most work is done here.
- Coral Dev Board: the target device that the model is deployed to.
- Type-C to USB cable: optional, if the PC and Coral Dev Board are under the same network.
Software setup
- Software AI-UI installed on the PC
- Windows Subsystem for Linux: installed on the PC with Edge TPU Compiler
- AI-UI on-device: installed on the Coral Dev Board
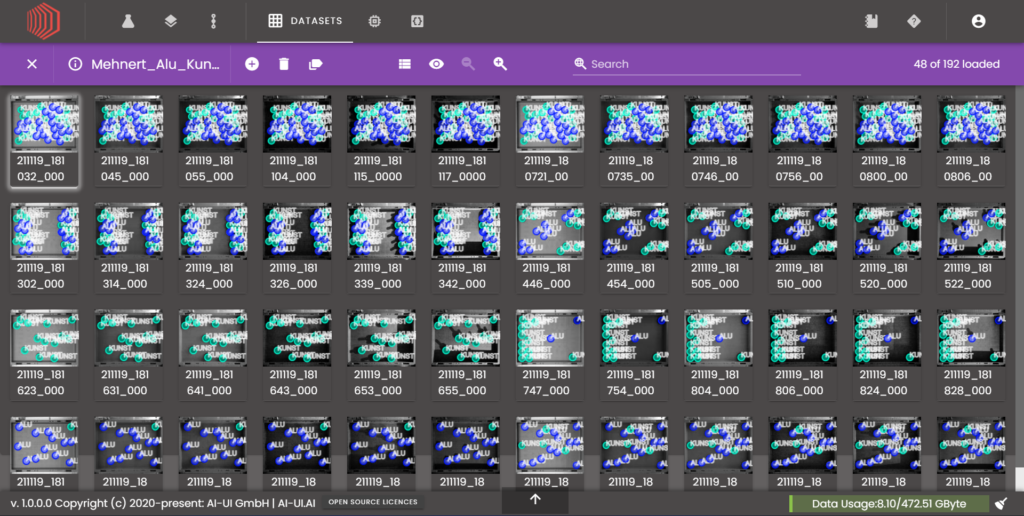
Dataset
The first step is to take a look at the dataset. Those images are taken by camera via the robotic arm through different light conditions. This is important for training a robust AI model. Because the real-world environment is complex in terms of light reflecting, for example the sun light changes during the day, somebody walks by with a phone on, production variance of the component surface, lights from other machine and so on. The more variants of light condition we consider, the better we can make use of the generalization ability of the AI model.
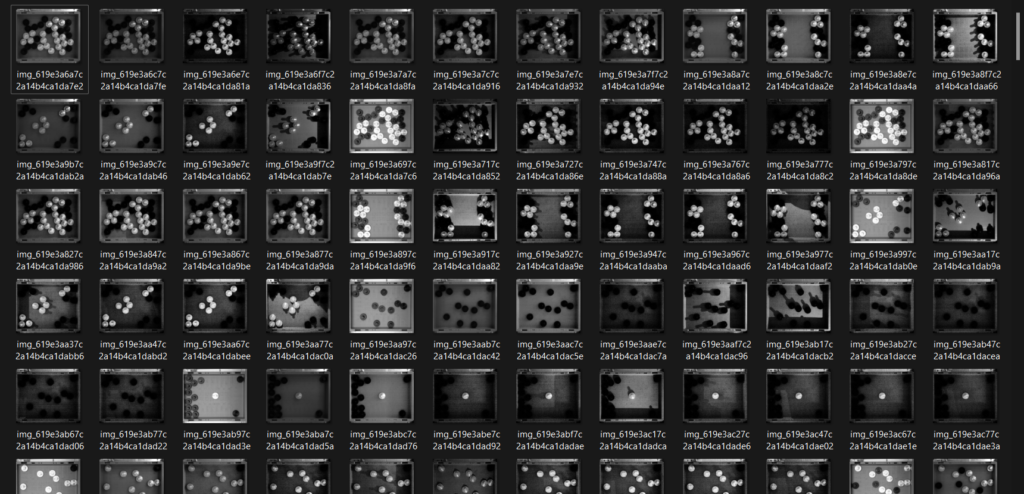
We can then import the data into AI-UI for next step: annotating.
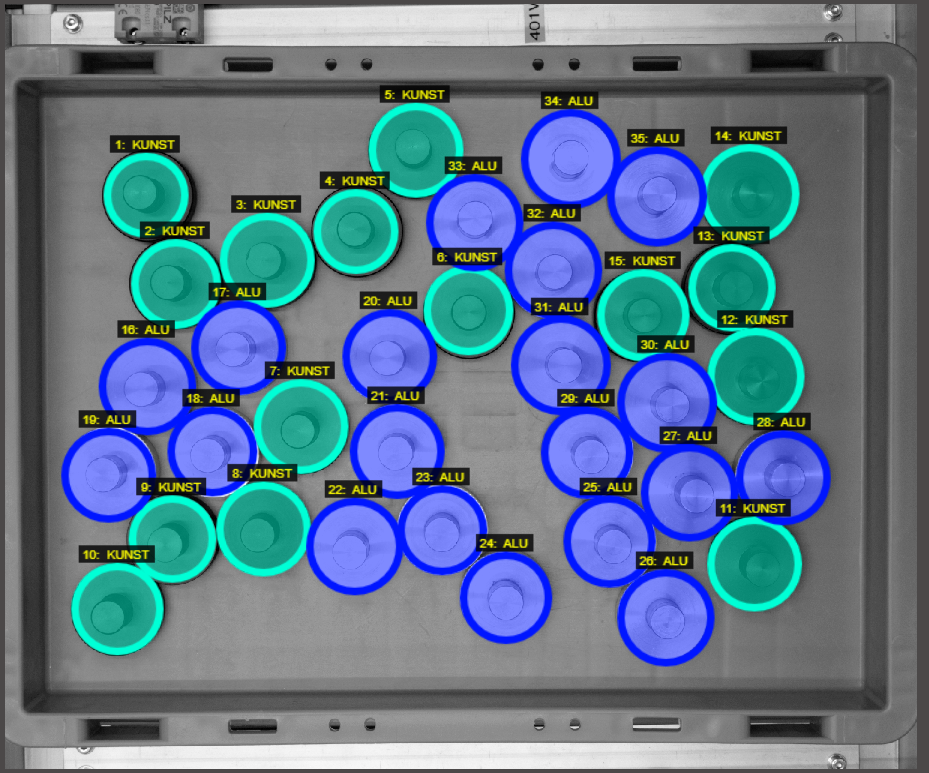
Annotation
Annotation is to tell the AI where to find an object and how this object is labeled, so that the AI can learn patterns to recognize it.
On the left tool panel, we choose circle as the annotating tool, then draw it on an object and then label it. By doing so, we want the AI in this project to learn the annotations as rectangle (box), which will be converted internally before model training. We use the circle to annotate the objects, so that the dataset can be applied for other scenarios requiring more precise predictions (for example more complex masks).
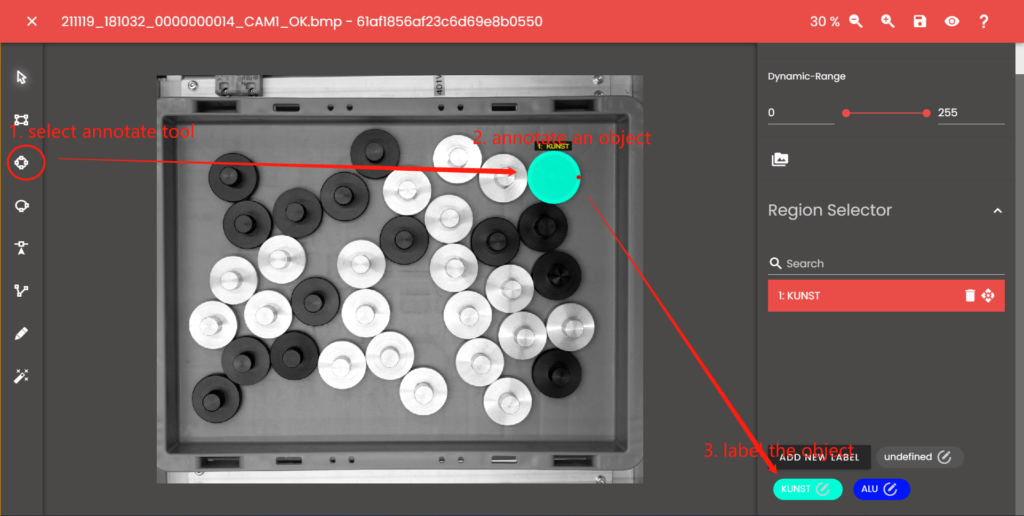
A few moment later, all the images are annotated.
Pre-process
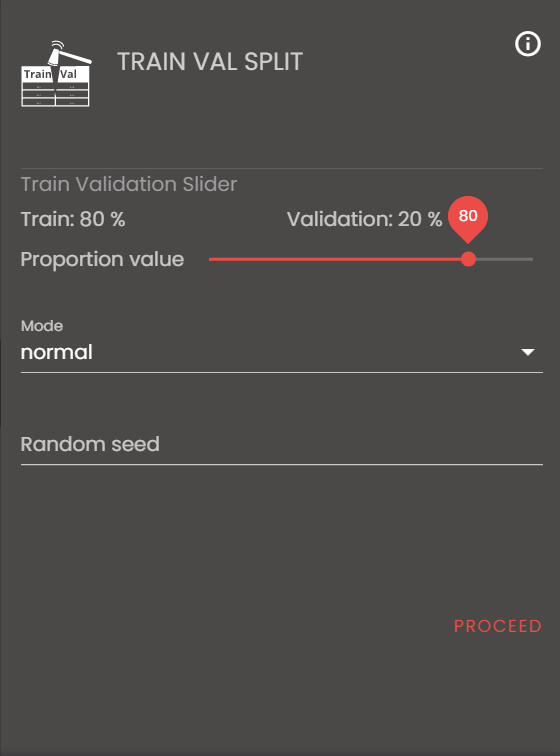
After annotation we should split the dataset into a train dataset and a validation dataset. The train dataset is used for model training and the model learns the information from it. The validation dataset contains images, that the model has never seen and this dataset is used for model evaluation.
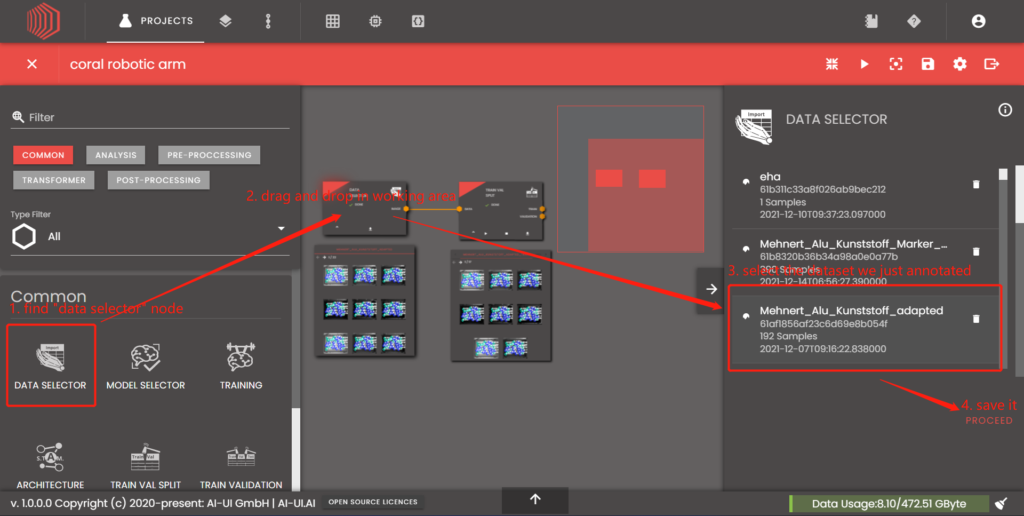
First we create a project in „AI-UI Project“ asset view with name „coral robotic arm“. In the project view, we find a data selector node on the left panel and drag&drop it into the working area in the middle. In the node configuration by the right side, we find the settings, belonging to the chosen node. In this case, datasets. Here you can find the dataset that we just annotated. Select it and click the „proceed“ button.
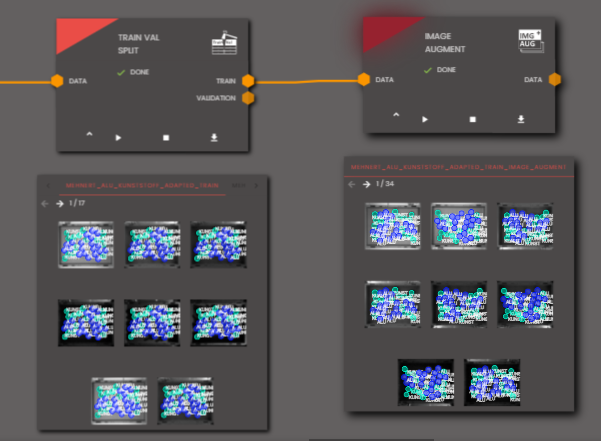
After that, the data selector node will produce an output socket representing the selected dataset. Then we create a train val split node and connect the output socket of data selector and the input socket of train val split node.
In the configuration of train val split node, we use „normal“ mode rather than „shuffle“, that means the split is done „chronological“, „shuffle“ would split the images in a random way. After clicking „proceed“, the node will produce two outputs representing train dataset and validation dataset.
Augmentation
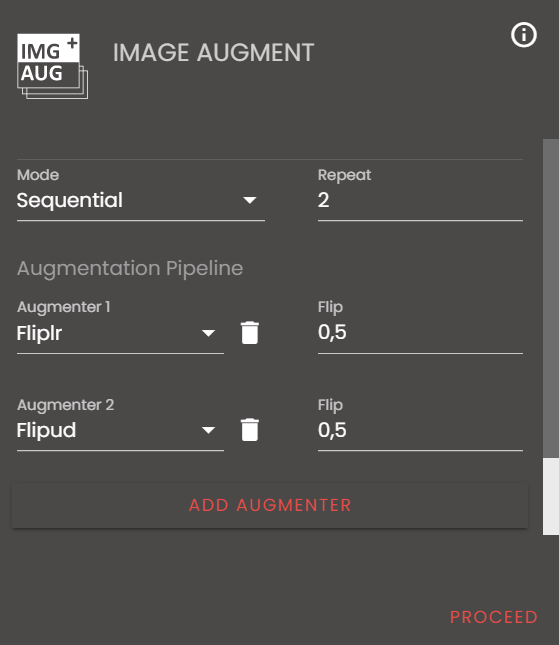
Data augmentation means a technique to enrich the data by applying different modifications randomly. In AI-UI, we can apply geometric transformations, flipping, cropping, rotation and noise injection on image datasets. To apply augmentation, create an „image augment node“ (by drag&drop), connect it with train set, then choose „Fliplr“ and „Flipud“ augmenters and click „proceed“. Because, we just want the data from the training dataset to be augmented. Validation data stays the same.
Neural network
Before training a model, we need to create a neural network. In this project, we use EfficientDet introduced by Tan et al. in EfficientDet: Scalable and Efficient Object Detection 2020.
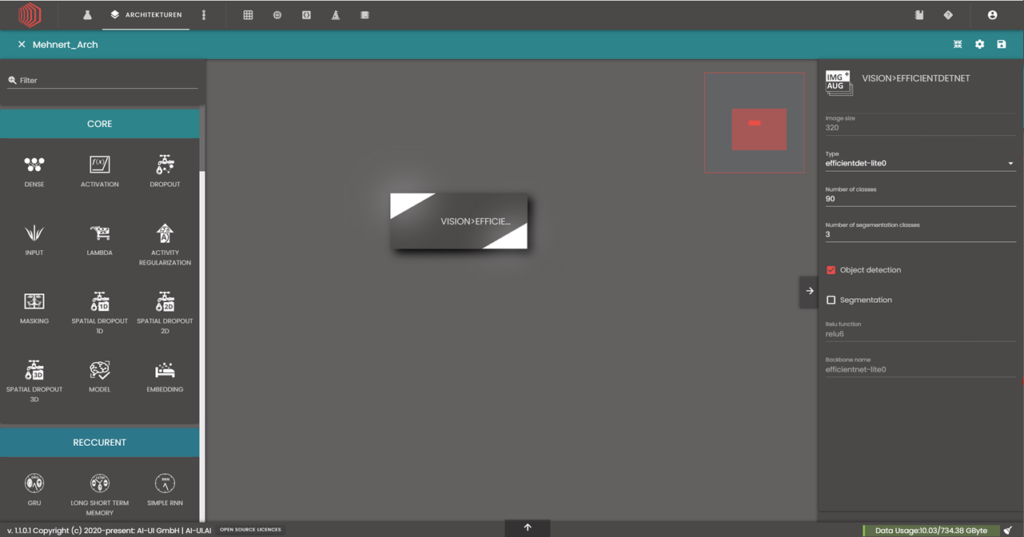
To use this model in AI-UI, create an architecture asset in the software and double click it for editing. In the STAM (Systematic and Touchable Architecture Modelling) designer, find the EfficientDet node from left panel, drag and drop it into working area in the middle and select the node for configuration. In the node configuration, set the height and width of the actual image size and use the „efficientdet-lite0“ type, which is optimized for mobile and edge devices.
Transfer learning
In this section, we will demonstrate how to train a model by using transfer learning from pre-trained weights in AI-UI.
Pre-trained weights are weights of a network that was trained on a large and general enough dataset (usually requiring hardware vastly). In transfer learning, we train this model further for a given task, taking the advantage of the knowledge gained by the previous training.
Model training
First, create an architecture node in the project and select the architecture created in previous section as we did for data selection. Then create a training node which takes augmented data as training set, validation data as validation set and architecture as inputs.
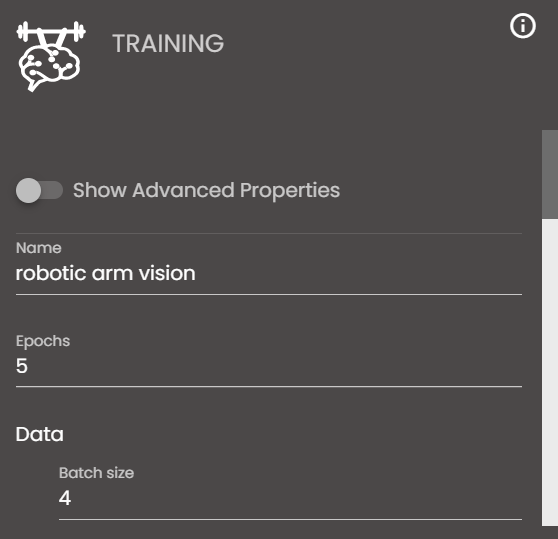
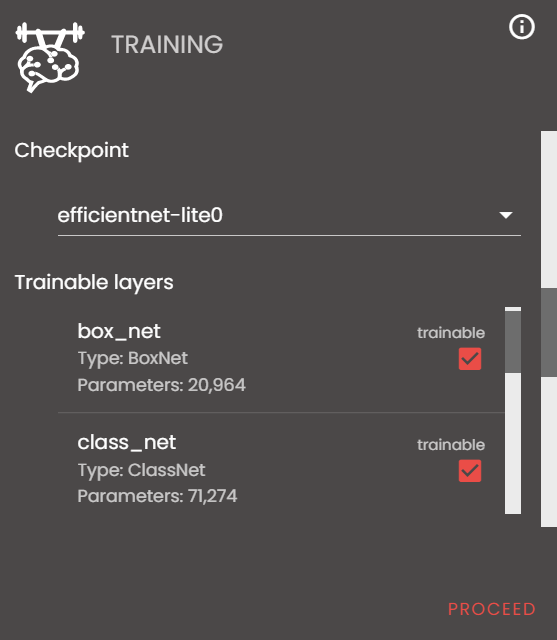
In the training node configuration, set „Epochs“ to 5, „Batch size“ to 4 and „checkpoint“ to „efficientnet-lite0“ to enable transfer learning. Then click „proceed“ to start the training process.
Model evaluation
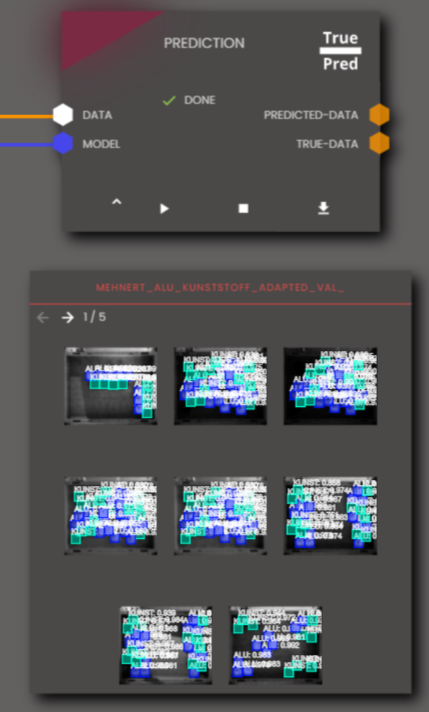
During the process, the training node will show different metrics in real time. When the training process is complete, the training node will produce a model socket as output, that represents the resulting model. Because an AI-Model is nothing more than data, fed to a neural network by training. We can use the model to predict the validation set with predict node and the result shows model predictions are reliable.
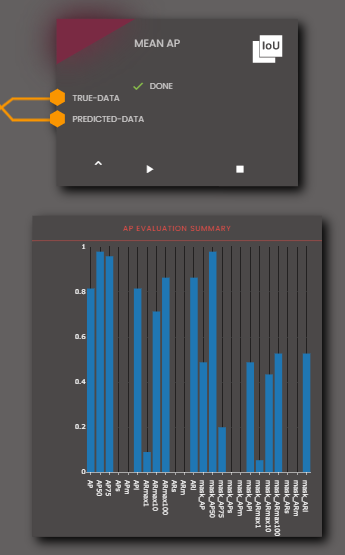
To evaluate the model quantitatively, create a meanAP (mean average precision) node and feed it with predicted-data and true-data. Mean average precision is a common evaluation method in object detection task and the result shows AP over 80%, AP50 and AP75 over 95%, which means the model serves with very high accuracy.

Create AI-Service pipeline
To use the trained model, there is a need to create a productive pipeline.
First of all switch over to the tab „API-Requests“ and create a new one.
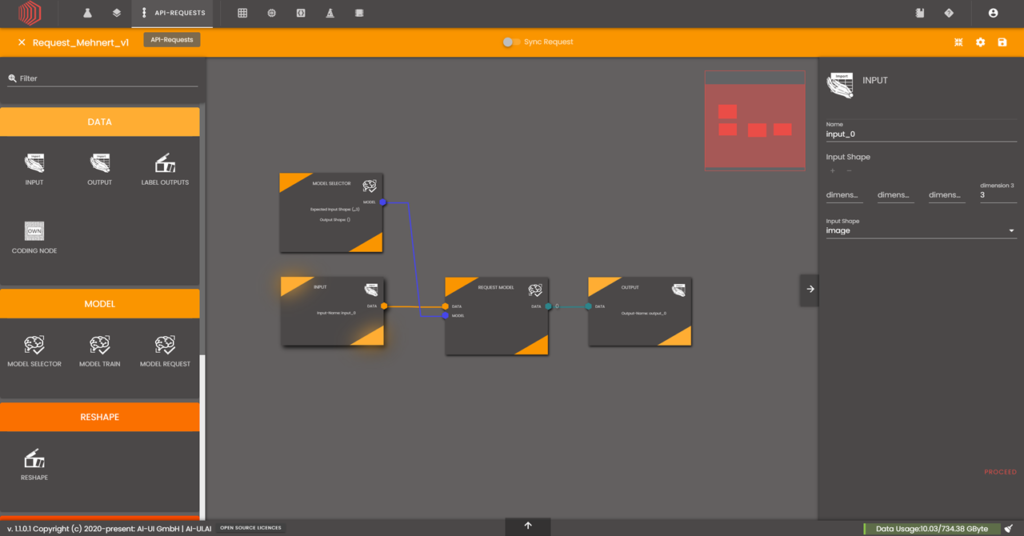
After creation, you will be able to leave the workflow back to the API-Requests overview and deploy your model.

By clicking on the „Deploy“ button, you reach an overview of you devices.
Deploy AI-service
First, make sure the Coral Dev Board is connected with the PC.
If you have clicked on the „Deploy“ button, found in „API-Requests“, you are now able to choose a model format and see if the device is „online“.

For our Coral Development Board, we are going to choose Edge TPU, cause this is the hardware, the model will be used on. Protobuf or Tensorflow Lite won’t work this way, cause the edge-TPU-compiler will compile the model in a way, that makes it usable for the TPU. This is also the reason, why not all possible AI-Models are deployable that easy on the Edge-TPU (not all NN-Layers are compilable).

If you choose „Edge TPU“ another menu is popping up.
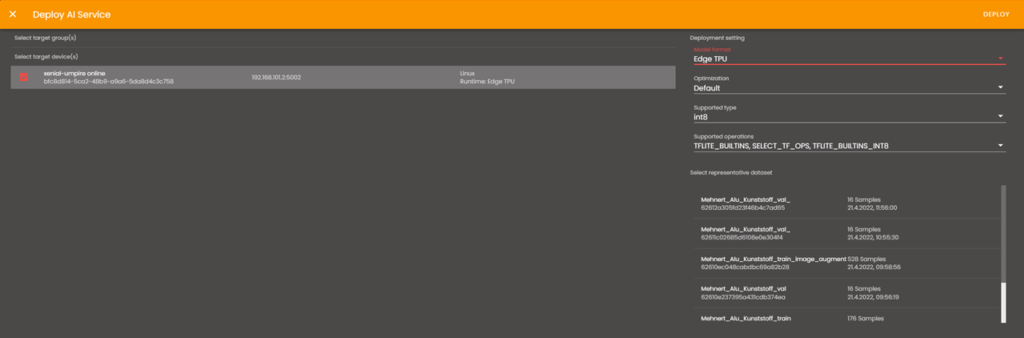
Now you will be able to choose optimization methods and type.
Also, you will have to choose a dataset that has been used for the model training or testing. TFlite uses it, to compile the model in the right way. Click on „Deploy“ and the model is send to the edge device.
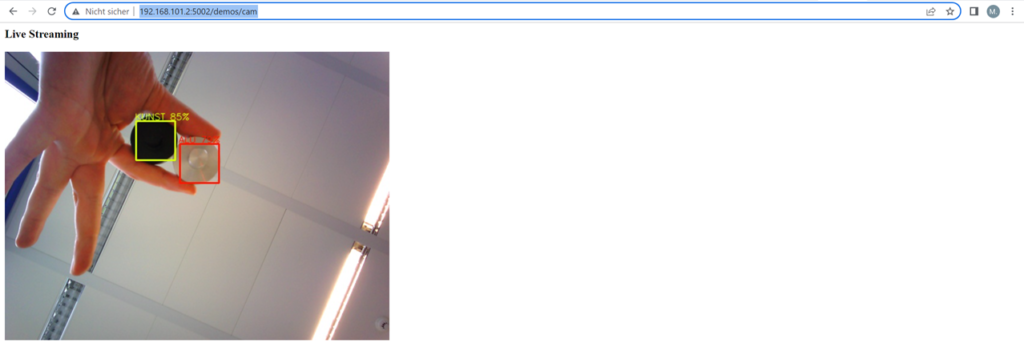
Inference
In this section, we will demonstrate how to deploy this model into production with Coral Dev Board. If you connect a Coral Camera to your Dev-Board, you will be able to access the inference-video-stream by the demo-api. First, go to the tab „EDGE“.

Because we have not defined any group of devices, you won’t find any entry here. If you click on the arrows, you will reach a menu, that shows all single devices.

Check again, if it is online and double click on it. Then you will reach an device manager that shows how many requests have been done via the api and you can choose models that have been already deployed on-the-fly.
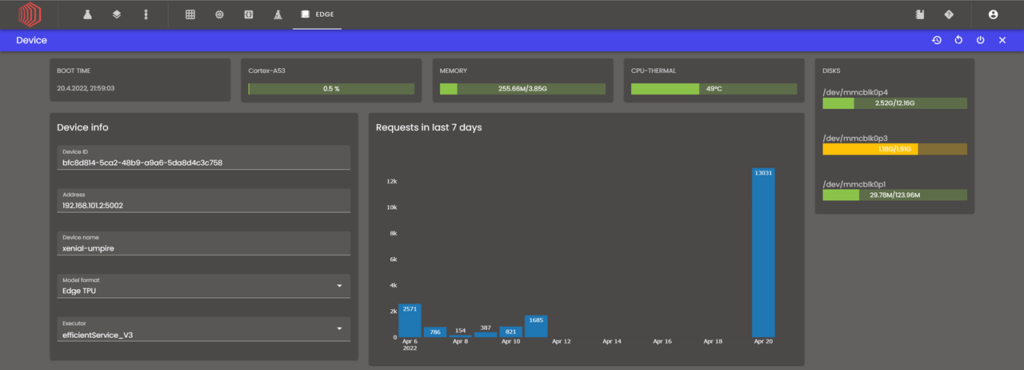
You can monitor the health status and check for the IP adress. This is the way, you will be able to run inferece via the camera device in your browser.
Open up the browser window and tab: http://192.168.101.2:5002/demos/cam (in this case) You choose the pattern: http://ip_of_edge_device:port_of_edge_device/demos/cam